Learn exactly how to start composting at home in 2025 — step by step, no jargon, no complicated equipment. Turn kitchen scraps into rich garden compost completely free. Works for any space.
Every time you throw a vegetable peeling in the bin, you’re throwing away something genuinely valuable.
Not in a dramatic way. Not in a way that should make you feel guilty. Just in a simple, practical way — those carrot tops, banana skins, coffee grounds, and cardboard boxes are the raw ingredients of compost. The richest, most beneficial thing you can add to your garden soil. And it costs absolutely nothing to make.
Composting is one of those rare habits that is good for your garden, good for your wallet, good for the planet, and genuinely satisfying to do. Composting is nature’s way of recycling — one of the most powerful actions we can take to reduce our trash and build healthy soil.
And yet most people assume it’s complicated. Messy. Something for serious gardeners with large gardens and specialist equipment.
It isn’t. Not even slightly.
This guide will show you exactly how to start composting at home — step by step, in plain language, with no assumed knowledge. Whether you have a large garden, a small balcony, or just a kitchen windowsill, there is a composting method that works for your space.
Let’s turn your kitchen scraps into garden gold.

Table of Contents
- Why start composting?
- How composting works
- Choose your composting method
- What you need to get started
- Step-by-step: how to start your first compost heap
- What to compost — the complete green and brown list
- What never to compost
- How to manage your heap week by week
- How to speed up composting
- Composting troubleshooting — problems and fixes
- How to know when compost is ready
- How to use finished compost
- How to start composting without a garden
- Composting FAQs
1. Why Start Composting? {#why-start}
Before the how, let’s make the why absolutely clear — because understanding what composting gives you is what keeps you motivated through the first few months.
It’s completely free fertiliser
You save money by producing a free, high-quality soil amendment — compost — which reduces your use of fertilizer and pesticides. Bagged compost from a garden centre costs £5–10 per bag. A productive vegetable garden needs dozens of bags per year. Making your own costs nothing.
It transforms your soil
Compost improves every type of soil — helping sandy soils retain water and nutrients, and opening up heavy clay soils for better drainage and root growth. Compost helps soil retain more moisture and nutrients. It also prevents erosion by breaking up compacted soil.
It fights climate change — genuinely
When organic waste is sent to landfill it rots and releases methane, a greenhouse gas with 21 times the global warming potential of carbon. Around 40% of waste placed in landfill bins is food and other compostable items — it’s a problem that every household can help tackle.
About 8% of planet-heating emissions come from wasted food. Starting a compost bin is one of the most tangible, immediate climate actions available to any household.
It reduces your bin waste dramatically
The average household throws away a significant proportion of waste as organic material — vegetable peelings, fruit scraps, cardboard, garden clippings. Composting diverts all of it and turns it into something useful.
It’s deeply satisfying
Although it may sound complicated, composting is very simple and makes for a fun, rewarding hobby. There’s something genuinely satisfying about the closed loop — kitchen scraps become compost, compost feeds the garden, the garden produces food, food produces more scraps. Waste becomes resource.
2. How Composting Works {#how-it-works}
You don’t need to understand the science to compost successfully — but knowing the basics helps you make better decisions and fix problems faster.
Composting is the managed, aerobic (oxygen-required) biological decomposition of organic materials by microorganisms. The end product is compost, a biologically stable soil amendment that can be used to build soil health and provide nutrients to plants.
In simpler terms: you pile up organic material, tiny living organisms break it down, and you get compost. That’s the whole process.
The four ingredients every compost heap needs
Carbon (browns) — dry, carbon-rich materials like cardboard, straw, dry leaves, and paper. Microorganisms use carbon and nitrogen to grow and reproduce, water to digest materials, and oxygen to breathe. Browns are the energy source.
Nitrogen (greens) — fresh, moist, nitrogen-rich materials like vegetable peelings, fresh grass clippings, and coffee grounds. Greens provide the protein microorganisms need to grow.
Moisture — your heap should feel like a wrung-out sponge throughout. Too dry and decomposition stops. Too wet and it goes slimy and smelly.
Air (oxygen) — aerobic bacteria (the good, fast-working ones) need oxygen. Turning your heap regularly introduces air and dramatically speeds decomposition.
The green-brown balance
A good compost pile can have equal amounts or up to three times as much brown material as green material.
In practice: every time you add a bucket of kitchen scraps (green), cover with a layer of torn cardboard or dry leaves (brown). This one habit keeps most heaps in perfect balance without any measuring or calculation.
Too many greens: Wet, slimy, smelly heap → add browns and turn. Too many browns: Dry, slow, inactive heap → add greens and water. Right balance: Active, earthy-smelling heap that breaks down steadily.
3. Choose Your Composting Method {#choose-method}
There is no single right way to compost. The best method is the one that suits your space, your lifestyle, and how much waste you generate.
Cold composting (the classic method)
Cold composting is basically your regular compost heap — it can literally be a pile in the garden, or a plastic ‘dalek’ type bin, or made from pallets, or anything in between. It’s mostly used for garden waste, and you can also put things like veg peelings and teabags in there.
Best for: Most beginners, gardens of any size, low-maintenance composting. Time to finished compost: 6–12 months (faster with turning). Upfront cost: Very low — free if using a pile or pallet bin, subsidised bins often available from councils.
Hot composting
Hot composting involves building a large heap all at once, maintaining the right moisture and green/brown balance, and turning frequently — every 3–7 days. This generates internal temperatures of 60–70°C, killing weed seeds and pathogens and producing finished compost in as little as 4–8 weeks.
Best for: Gardeners who want fast results, those with lots of material available at once. Time to finished compost: 4–8 weeks. Upfront cost: Low — just needs a large enough space (ideally 1 cubic metre).
Compost tumbler
A compost tumbler is a container designed to make it easier to rotate and mix your composting materials. It sits off the ground on a frame, you load organic material in, and turn the drum every few days to mix and aerate.
Best for: Small gardens, people worried about pests, those who want faster results than a static bin. Time to finished compost: 4–8 weeks with regular turning. Upfront cost: Higher — tumblers typically cost £50–200.
Worm composting (vermicomposting)
Wormeries are special bins or containers with worms in — they tend to be used more for food waste rather than garden waste. Special composting worms (red wigglers) process your kitchen scraps into worm castings — one of the most nutrient-dense natural fertilisers available.
Best for: Small spaces, flats, apartments, anyone without outdoor space. Time to finished compost: 2–3 months. Upfront cost: Low to medium — worm bins available from £30.
Bokashi composting
Bokashi bins are a different kind of magic — they kind of pickle the food waste, meaning that you can then put kitchen waste in a regular compost bin. A sealed bucket with beneficial microorganisms processes all kitchen waste — including meat and dairy that can’t go in a regular heap.
Best for: Flats, apartments, those who want to compost everything including cooked food and meat. Time to use: 2–4 weeks fermentation, then buried or added to heap. Upfront cost: Low — starter kits available from £20–40.
4. What You Need to Get Started {#what-you-need}
The good news: you need very little.
A compost container or space
Option 1 — Plastic compost bin (dalek bin) The most common type of compost bin, a heavy-duty plastic cylinder with an open bottom and a lid, is easy to pest-proof. Clear a flat spot of earth, lay down a piece of sturdy wire mesh and place your bin on top. Many UK councils sell these subsidised or free — check your council website before buying one full price.
Option 2 — DIY pallet bin Four wooden pallets stood on their sides and cable-tied at the corners make an excellent, free compost bay. Pallets are often available at no cost from garden centres, builders merchants, or community marketplace sites.
Option 3 — Simple open pile While it’s not necessary to have a structure around the pile, a compost bin can make building and maintaining the pile easier. An open pile in an out-of-the-way corner works perfectly well and costs nothing. Slower and less tidy than a contained system, but completely effective.
Option 4 — Compost tumbler Best if you have limited space, want faster results, or are concerned about pests accessing an open heap.
A kitchen caddy
A small countertop container to collect kitchen scraps before transferring to your outdoor heap. You can store the food scraps in a bag in your freezer or the back of the fridge — an easy way to avoid odors and insects in your kitchen.
It doesn’t have to be all the things that you find online that are really cute little ceramic containers — it can just be an old milk carton. Any lidded container works.
Basic tools
A garden fork or corkscrew-shaped compost aerator for turning. A simple and inexpensive turning tool can help your compost break down faster. That is genuinely all you need beyond the container itself.
5. Step-by-Step: How to Start Your First Compost Heap {#step-by-step}
Step 1: Choose your location
Try to select an outdoor location with partial shade and plenty of drainage. It’s also important to pick an area that’s easily accessible but removed from animals, including pets and wildlife.
The single most practical piece of advice: the best place is actually the place that’s easy to get to and where it’s actually going to be used. If you’ve got to trek to the bottom of the garden every time the food waste caddy is full, you’re much less likely to bother.
Avoid placing the bin against a building or near a downspout. Make sure water can reach the pile easily. And ensure it sits on bare soil, not concrete — this allows worms and beneficial organisms to enter from below.
Step 2: Pest-proof your bin (optional but recommended)
A sheet of wire mesh under your compost bin will stop mice and rats from burrowing in. Wrapping the wire up around the edges makes it extra secure. Your mesh should be fine enough to stop mice but open enough to let in good critters like worms — approximately 1cm grid is ideal.
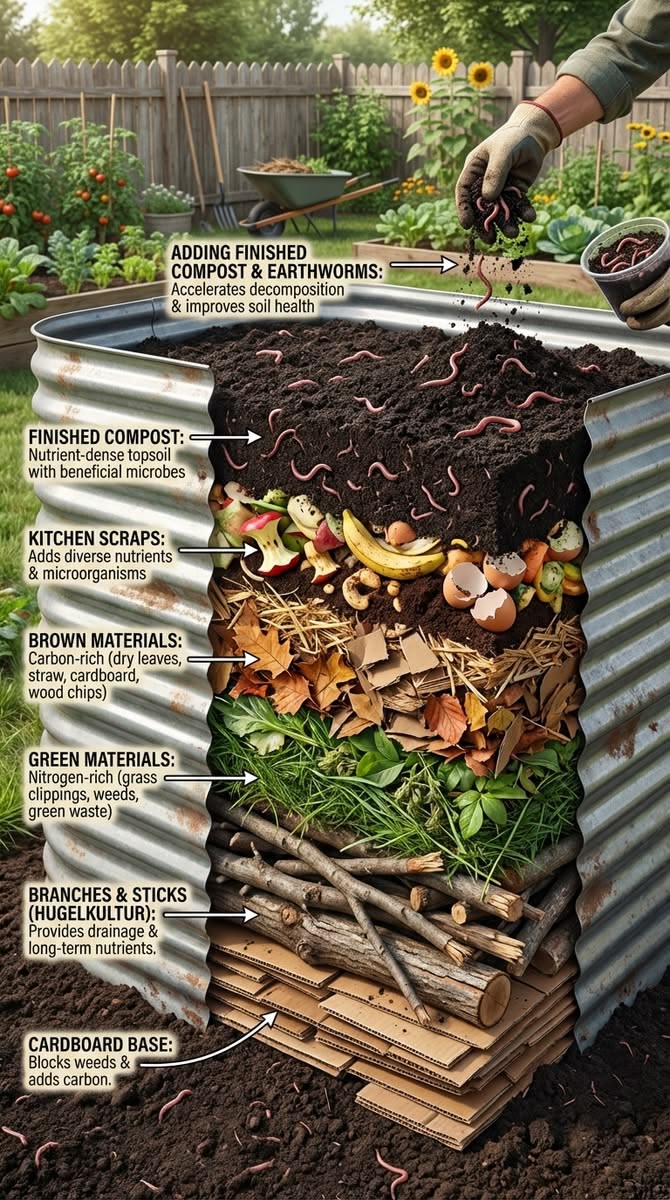
Step 3: Create a base layer
It’s good (but not essential) to start with a base layer of something that helps aeration and drainage, like twigs or wood chips.
Add a 10cm base layer of coarse, carbon-rich material — small twigs, scrunched cardboard, straw. This creates airflow and drainage at the very bottom of your heap, preventing it from becoming waterlogged and anaerobic.
Step 4: Start adding materials in layers
It’s generally recommended to alternate green and brown materials in layers.
- Add a layer of green material (kitchen scraps, fresh garden waste) — 5–10cm thick
- Cover immediately with a layer of browns (torn cardboard, dry leaves) — 5–10cm thick
- Repeat every time you add to the heap
The practical version: keep a bag of torn cardboard next to your bin. Every time you add kitchen scraps, throw a handful of cardboard on top. That’s it.
Step 5: Keep it covered
Cover your heap with a lid, old piece of carpet, or cardboard. This retains moisture and heat, prevents the heap being waterlogged by heavy rain, and keeps pests out.
Step 6: Add to it regularly
Your heap is started. Now add to it regularly — ideally daily or every few days as you fill your kitchen caddy. The more consistently you add, the more consistently it produces.
Step 7: Check and turn monthly
Check on your compost pile weekly to see how it looks. Dig into the pile and observe: does it seem dry? Add water! Is it a little smelly? Mix the pile up with a shovel or corkscrew aerator to introduce more air.
A monthly turning — moving outer material to the centre — introduces oxygen and significantly speeds decomposition.
6. What to Compost — The Complete Green and Brown List {#what-to-compost}
Greens (nitrogen-rich — add these regularly)
From the kitchen:
- All fruit and vegetable peelings and scraps
- Banana skins, apple cores, citrus peel
- Tea bags, coffee grounds, eggshells, old flowers — even human hair
- Stale bread and grains (bury in the centre to deter pests)
- Loose tea leaves and paper coffee filters
From the garden:
- Fresh grass clippings (add in thin layers — thick clumps mat and go slimy)
- Fresh plant trimmings and soft prunings
- Annual weeds before they set seed
- Spent plants after harvesting
Browns (carbon-rich — essential for balance)
Paper and cardboard:
- Cardboard boxes torn into pieces — one of the best browns, use generously
- Newspaper and plain paper, scrunched or shredded
- Paper bags, paper towels, cardboard egg boxes
- Toilet roll and kitchen roll tubes
- Cereal boxes (remove any plastic window)
Garden materials:
- Dry autumn leaves (shred to prevent matting)
- Straw and hay
- Wood chip from untreated wood
- Dry plant stems broken into shorter lengths
- Small twigs
Other:
- Natural fibre materials — cotton, wool, jute — cut small
- Wood ash from log fires (in small quantities)
- Pet bedding from herbivores (rabbits, guinea pigs)
The secret weapon: cardboard
Cardboard is arguably the single best composting material for beginners. Always available, breaks down reliably, absorbs excess moisture, and provides excellent carbon balance. Smaller pieces compost more quickly — give your compost a helping hand by cutting up big stems and breaking down cardboard. Tear boxes into hand-sized pieces before adding.
7. What Never to Compost {#never-compost}
Meat and dairy products are asking for trouble. Other things that may attract pests include cooked food, oily things, buttery things and bones.
Here is the complete never-compost list:
Absolute no-gos:
- Meat, fish, and bones — attract rats, create persistent odours
- Dairy products — same problems as meat
- Cooked food — particularly fatty or processed food
- Dog and cat waste — contains harmful pathogens
- Diseased plant material — diseases survive cool heaps and spread in your garden
- Weeds that have set seed — seeds survive and spread wherever you use compost
- Perennial weed roots — bindweed, couch grass, ground elder survive and regrow
- Treated or painted wood — chemicals don’t belong in your soil
- Glossy or heavily printed paper — coatings don’t break down cleanly
- Coal ash — contains compounds harmful to soil biology
A note on “compostable” packaging: Some products say “compostable” on them — like “compostable bags” and “compostable wipes” — but most of these only break down in industrial composting facilities at very high temperatures. They won’t break down in a home compost heap and can contaminate your finished compost. Check for the certified home-compostable label specifically.
8. How to Manage Your Heap Week by Week {#managing}
Composting is low-maintenance by nature — but a little regular attention produces dramatically better results.
Daily (30 seconds)
Add your kitchen caddy contents. Cover with a handful of browns. Replace the lid. Done.
Weekly (5 minutes)
In hot weather you may need to add water to your compost, to keep those beneficial microbes and insects thriving. Check moisture — the heap should feel like a wrung-out sponge. Check for smells — a good heap smells earthy and pleasant. Any sour or ammonia smell signals an imbalance.
Monthly (15–20 minutes)
Turn the heap with a garden fork. Move outer material to the centre, inner material to the outside. This is the single most effective thing you can do to speed up the process. Turning once a week or so is helpful but not a deal-breaker. If you have a good green/brown balance, compost is very forgiving.
9. How to Speed Up Composting {#speed-up}
A well-managed heap produces finished compost in 2–3 months. A neglected one can take 18 months. These techniques make all the difference:
Chop and shred everything
Smaller pieces compost more quickly — give your compost a helping hand by cutting up big stems, crushing eggshells and so forth. More surface area means more microorganism activity.
Turn frequently
If practiced regularly, these little chores will help your compost pile turn into nutrient-rich compost for your garden in as little as 3 months. The more you turn, the faster it goes.
Build a minimum pile size
A compost pile should be a minimum of 3 cubic feet in size — this is the optimum size range to allow the pile to heat to the correct temperature to decompose material quickly, maintain heat during colder months, and allow for enough air flow.
Add natural activators
These introduce or boost the microorganisms that drive decomposition:
- Fresh nettles — one of the best natural activators, extremely high in nitrogen
- Comfrey leaves — rich in nutrients, breaks down rapidly
- A shovelful of finished compost — introduces billions of the right microorganisms instantly
- Fresh grass clippings — high nitrogen heats the heap quickly
- Human urine — diluted 10:1 with water, an effective free nitrogen source
Keep it covered and insulated
Retaining heat and moisture accelerates decomposition significantly. In cold weather, insulate your heap with straw bales or old carpet to maintain temperatures and keep composting active into autumn.
10. Composting Troubleshooting — Problems and Fixes {#troubleshooting}
Problem: Heap smells like rotten eggs
Cause: Too many greens, too wet, not enough air — heap has gone anaerobic. Fix: Add generous browns (torn cardboard), turn thoroughly to introduce air. Smell improves within 24–48 hours.
Problem: Heap smells like ammonia
Cause: Too much nitrogen — excess grass clippings or food scraps without enough carbon. Fix: Add lots of browns and turn. You’re losing valuable nitrogen as gas — rebalance with more carbon material.
Problem: Heap is completely dry and inactive
Cause: Too dry, too many browns without greens, or very cold weather. Fix: Add water thoroughly until heap feels like a wrung-out sponge. Add fresh greens and an activator. Turn to mix moisture through evenly.
Problem: Flies around the heap
Cause: Fresh food scraps left exposed on the surface. Fix: Always bury fresh kitchen scraps in the centre and cover immediately with browns. A well-fitting lid prevents fly access.
Problem: Rats or mice in the heap
Cause: Cooked food, meat, or dairy attracting vermin. Fix: Never add meat, dairy, or cooked food. Use a rodent-proof bin with solid plastic base and fine wire mesh lining around the sides.
Problem: Nothing seems to be decomposing
Cause: Too dry, too cold (winter), too many browns, or materials are too large. Fix: Check moisture, add greens and activator, chop materials more finely, and be patient — very cold weather genuinely halts composting temporarily.
Problem: Weed seedlings in finished compost
Cause: Weed seeds not killed — heap didn’t get hot enough. Fix: Avoid adding seeding weeds. Turn more frequently in future to generate heat. Or spread finished compost in the sun for a few weeks to germinate and kill seeds before using.
11. How to Know When Compost Is Ready {#when-ready}
Compost is ready when there are no longer recognisable bits of food or garden waste in the pile, and it resembles soil.
Here’s exactly what to look for:
Appearance: Dark brown to black, uniform, crumbly. You cannot identify the original materials.
Smell: Rich, earthy, and genuinely pleasant — like woodland soil after rain. This is the most reliable indicator.
Texture: Falls apart easily in your hands. Not slimy, not fibrous, not compacted.
Temperature: A finished heap has cooled down completely. Warmth in the centre means active decomposition is still happening.
What to do if it’s not all finished: Sieve through a piece of wire mesh — material that passes through is finished compost ready to use. Material that doesn’t pass through goes back in the heap for another cycle.
12. How to Use Finished Compost {#how-to-use}
Your compost is ready. Here is how to put it to work:
As a soil improver
Dig 5–10cm of finished compost into vegetable beds each spring before planting. This replenishes nutrients, improves soil structure, and feeds the soil ecosystem. The single most impactful use of your compost.
As a mulch
Spread a 5cm layer on the surface of planted beds. Suppresses weeds, retains moisture, regulates soil temperature, and slowly feeds as rain washes nutrients down. Apply in spring and again in autumn.
In containers and raised beds
Mix homemade compost into peat-free potting compost — 30–40% compost by volume gives excellent results for most vegetables and herbs.
As a lawn top dressing
Sieve finely and rake a thin layer (5–10mm) over your lawn in autumn. Improves soil structure beneath the grass and feeds it naturally over winter.
As compost tea
Steep finished compost in water for 24–48 hours, strain, and use the resulting liquid as a gentle plant feed. A completely free liquid fertiliser from your own garden waste.
13. How to Start Composting Without a Garden {#no-garden}
No outdoor space? You can still compost — and still benefit from it.
Worm composting (vermicomposting)
A worm bin can live on a balcony, in a garage, or under the kitchen sink. Composting worms (red wigglers) process kitchen scraps into extraordinarily rich worm castings. Completely odourless when managed correctly. Produces worm tea — a potent liquid fertiliser — as a bonus.
Getting started: Buy a worm bin (or build one from two stacking plastic boxes), order red wiggler worms online, add damp bedding (shredded cardboard), add worms, start adding kitchen scraps gradually.
Bokashi composting
A sealed, anaerobic fermentation system that processes all kitchen waste — including cooked food, meat, and dairy — in a countertop-sized bucket. No smell. Works in any space. The fermented material is then buried in soil or added to a traditional heap to finish decomposing.
Community composting
If you don’t have a backyard and still want a traditional composting experience, you can take your food scraps to a compost pile that you share with neighbours or at a community garden. Check your local council website or community groups — many urban areas have drop-off points or shared composting schemes.
14. Composting FAQs {#faqs}
How long does composting take? When done properly, a compost can go from start to finish in as little as three months. A cold heap with minimal turning may take 6–12 months. Hot composting with frequent turning: 4–8 weeks.
Does compost smell bad? A well-managed heap should smell earthy and pleasant — like good garden soil. Bad smells indicate an imbalance. Fix the green/brown ratio and turn to reintroduce air.
Can I compost in winter? Yes — keep adding material through winter. Decomposition slows in cold temperatures but doesn’t stop entirely. Insulate your heap to retain warmth. Activity picks up naturally in spring.
How big does my compost heap need to be? A good compost pile should be a minimum of 3 cubic feet (3 feet wide by 3 feet long by 3 feet tall), but not larger than 5 cubic feet. Smaller heaps are slower; larger ones can be harder to manage.
Do I need to buy a compost bin? No. A simple pile works perfectly well. But a bin retains heat and moisture better, keeps things tidier, and is generally more pest-resistant.
Can I compost if I rent my home? Yes. A compost tumbler or worm bin can be moved when you leave. Bokashi bins work indoors. Many councils also offer food waste collections even for rental properties.
What if I produce very little waste? Even small amounts composted consistently build up over time. Supplement your kitchen scraps with cardboard — there’s always cardboard available — to keep the heap balanced and active.
Final Thoughts
Starting a compost heap is one of the best decisions you can make as a gardener — and as a household.
It costs essentially nothing. It takes minutes per week. It transforms waste you’d otherwise bin into the most valuable material you can add to your garden. And once you’ve used your first batch of homemade compost — dark, crumbly, sweet-smelling, and free — you’ll understand why gardeners get so passionate about it.
Set up your bin today. Add your first kitchen scraps tonight. Cover with cardboard. Put the lid on.
That’s it. You’ve started composting.
Happy composting, Sajjad
Read these next:
- What is composting and why every gardener needs it
- Composting for Beginners: Turn Kitchen Scraps into Garden Gold
- Worm composting (vermicomposting) for beginners
- Best soil for vegetable gardens: what to use and why